
Introduction
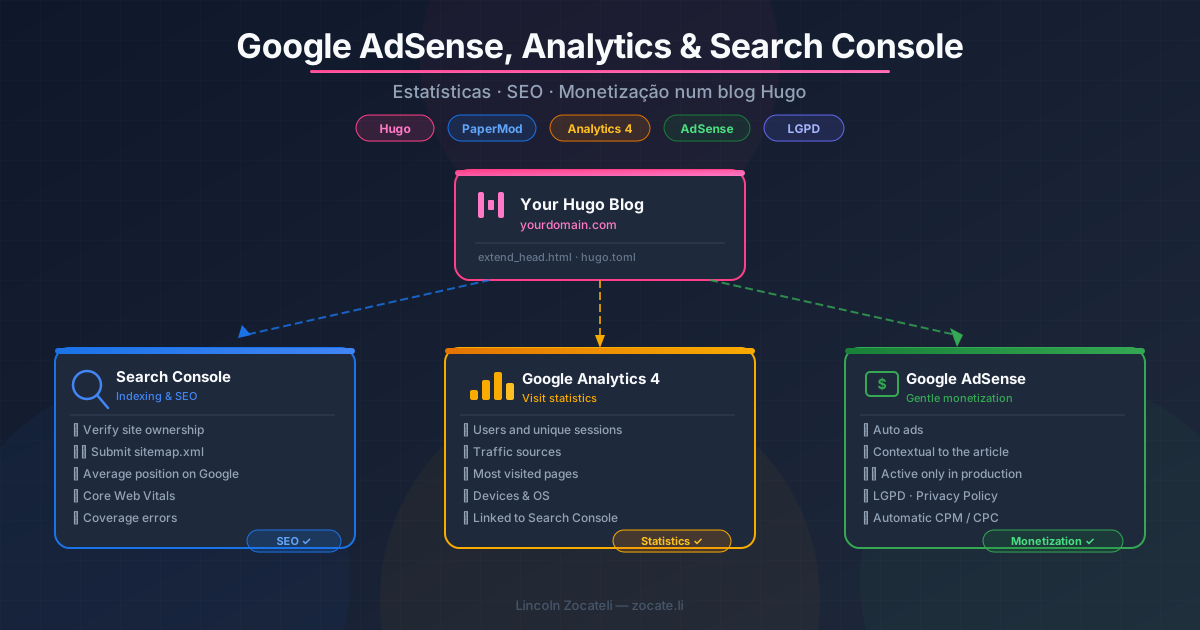
When your blog starts gaining readers, three natural needs arise:
| Need | Google tool |
|---|---|
| Know how many people visit and where they come from | Google Analytics 4 |
| Show up on Google and be indexed correctly | Google Search Console |
| Generate revenue without invading the reader’s experience | Google AdSense |
The three tools share the same Google account and complement each other. This guide covers all three from scratch — from creating the account to the real integration with Hugo + PaperMod — including the exact files that need to be created or edited.
Prerequisites
Before you start, make sure you have:
- A Hugo blog published on your own domain (
https://seudominio.com.br) with HTTPS enabled - The PaperMod theme installed (any recent version)
- A Google account (Gmail works)
- At least a few published pages (Google rejects empty sites)
enableRobotsTXT = trueinhugo.toml✅ (this blog already has it)
File structure relevant to this tutorial:
| |
Part 1 — Google Search Console (indexing and SEO)
Search Console tells Google that your site exists, which pages to index, and provides organic performance reports: clicks, impressions and average position for each keyword.
Step 1.1 — Create the property in Search Console
- Go to search.google.com/search-console and click “Add property”.
- Choose “URL prefix” and enter
https://seudominio.com.br(with HTTPS, no trailing slash). - On the verification screen, select the “HTML tag” method.
The console will show something like:1<meta name="google-site-verification" content="AbCdEfGhIjKlMnOpQrStUvWxYz1234567" /> - Copy only the
contentvalue — in the example above:AbCdEfGhIjKlMnOpQrStUvWxYz1234567.
Don’t click “Verify” yet (the site needs to be published with the tag first).
Step 1.2 — Add the verification to hugo.toml
Open hugo.toml at the project root and, inside the existing [params] block, add the line:
| |
PaperMod automatically renders this meta tag in the <head> of every page.
How to check that the tag was inserted: publish the blog, open any page in the browser, press
Ctrl+Uto view the source and search forgoogle-site-verification. It should appear inside the<head>.
Step 1.3 — Verify the property
- Go back to Search Console and click “Verify”.
- The status should change to “Verified” ✅.
- If it fails, wait a few minutes (the CDN cache may delay the update) and try again.
Step 1.4 — Submit the sitemap
Hugo generates sitemap.xml automatically at the root of public/. We need to tell Google about it:
- In the Search Console panel, go to Index → Sitemaps.
- In the “Add a new sitemap” field, type
sitemap.xmland click Submit. - Wait; after processing, the status changes to “Success” and shows the number of URLs found.
This blog already has
enableRobotsTXT = trueinhugo.toml, so Google will also receive a correctrobots.txtautomatically. Confirm athttps://seudominio.com.br/robots.txtthat there is noDisallow: /.
Step 1.5 — Check indexing of individual pages
After a few days, use URL Inspection (magnifying glass icon at the top of Search Console):
- Paste the full URL of any article.
- If it shows “URL is not on Google”, click “Request indexing”.
- Google puts the URL in the crawl queue — it usually shows up indexed within 24–72 hours.
Part 2 — Google Analytics 4 (visit statistics)
GA4 records sessions, unique users, most visited pages, traffic source, devices, session duration and much more.
Step 2.1 — Create the GA4 account and property
- Go to analytics.google.com → “Start measuring”.
- Fill in the account name (e.g.
Blog zocate.li). - Create the Property:
- Name: your blog’s name
- Time zone:
(GMT-03:00) Brasília Time - Currency:
Brazilian Real (BRL)
- Under Platform, select Web.
- Enter the site URL and the data stream name (e.g.
zocate.li). - Write down the measurement ID in the format
G-XXXXXXXXXX— you will need it in the next step.
Step 2.2 — Integrate GA4 with Hugo
Hugo has native support for Google Analytics through the [services] block. PaperMod reads this configuration automatically, so you only need to add to hugo.toml:
| |
Where to put it: outside the
[params]block, at the root level ofhugo.toml. See the full example in Part 4.
How PaperMod controls when the script is loaded
PaperMod injects the GA4 script only when params.env = "production". This blog already has it set in hugo.toml:
| |
When you run hugo server locally, Hugo loads the development environment and applies the overrides from config/development/hugo.toml. To disable GA in development and avoid polluting your metrics, add to the config/development/hugo.toml file:
| |
After this addition, your config/development/hugo.toml looks like this:
| |
Check that GA4 is being loaded in production
Publish the blog and inspect the HTML of any page:
| |
You should see something like:
| |
Step 2.3 — Confirm data collection in the GA4 panel
- Open GA4 and go to Reports → Realtime.
- Open your blog in another tab (with the production environment published).
- The “Realtime” panel should show 1 active user. ✅
Step 2.4 — Link GA4 to Search Console
This lets you see in Analytics which search terms brought organic visitors.
- In GA4: Admin (gear) → Product links → Search Console.
- Click Link → select your Search Console property → Confirm.
- After a few days, the “Acquisition → Traffic acquisition → Search Console” report will show keywords and positions.
Part 3 — Google AdSense (gentle monetization)
AdSense displays contextually relevant ads. Auto ads mode is the “gentlest”: Google picks placement and format with minimal intrusion for the reader.
Step 3.1 — Create the AdSense account
- Go to adsense.google.com → “Get started”.
- Enter the site URL (
https://seudominio.com.br) and the main language (Portuguese). - Fill in the tax information (CPF or CNPJ) and address — Google requires this to issue payments.
- Accept the terms and submit the review request.
Approval criteria:
— Site with HTTPS and its own domain ✅
— Original content (no copying from other sites) ✅
— Privacy Policy published and accessible ✅
— No prohibited content (violence, adult, piracy)
— Minimum content volume (usually ≥ 20–30 articles)
The review can take from a few days up to 2–3 weeks. Google may request an additional review.
Step 3.2 — Choose the placement strategy
AdSense offers two approaches:
| Approach | How it works | Pros | Cons |
|---|---|---|---|
| Auto ads | Google decides where and when to show | Zero configuration | May insert ads in the middle of code blocks |
| Manual units | You define the exact position and format | Full control of the experience | Requires template configuration |
For a technical blog, the manual approach is recommended: it prevents ads from appearing inside code snippets and keeps reading smooth.
Getting the Publisher ID
- In the AdSense panel, click Ads → By ad unit.
- Your Publisher ID (
ca-pub-XXXXXXXXXXXXXXXXX) appears in the upper right corner of the panel. - Write it down — it will be used in
hugo.toml.
Creating the manual ad units
Create two units:
Unit 1 — In-Article (shown in the middle of the post, after the 4th paragraph):
- Click “Create ad unit” → “In-article”.
- Name it
in-article-post. - Copy the
data-ad-slotvalue shown in the snippet — e.g.1234567890.
Unit 2 — Display (shown before the comments):
- Click “Create ad unit” → “Display”.
- Name it
display-pre-comments, Responsive format. - Copy the
data-ad-slotvalue — e.g.0987654321.
Step 3.3 — Add AdSense to hugo.toml
Add the Publisher ID and the two slot IDs to hugo.toml, inside the [params] block:
| |
While the slots are an empty string
"", no ad is rendered — safe for partial commits.
Step 3.4 — Update layouts/partials/extend_head.html
PaperMod exposes the extend_head.html hook to inject code into the <head> without modifying the theme. The file must contain Google Consent Mode v2 (mandatory for GDPR/LGPD) followed by the AdSense script:
| |
Consent Mode v2 is required by Google for publishers serving European users (GDPR). The defaults are all
denied; the cookie banner (implemented inextend_footer.html) callsgtag('consent', 'update', ...)when the user accepts.
GA4: don’t include it here — PaperMod injects it automatically via[services.googleAnalytics].
Step 3.5 — Create the ad partials
Create two files in layouts/partials/:
layouts/partials/adsense-inarticle.html — In-Article ad:
| |
layouts/partials/adsense-display.html — Display ad:
| |
Step 3.6 — Update layouts/_default/single.html
This file controls the layout of each post. Edit it to inject both ads:
- In-Article: via JavaScript, inserted dynamically after the 4th paragraph of the content
- Display: positioned between the post tags and the comments section
| |
Why use
<template>? The<template>element is not rendered by the browser until it is cloned via JS. This prevents AdSense from trying to initialize the ad before it is positioned in the DOM, eliminatingadsbygoogle.pusherrors.
Step 3.7 — Check that the ads appear in production
After publishing:
| |
Expected output:
| |
If it doesn’t appear, confirm that env = "production" is in hugo.toml and that the build was done in production mode.
Part 4 — Final hugo.toml configuration
Consolidating all the previous steps, your hugo.toml should have the following additions:
| |
And config/development/hugo.toml with the environment override:
| |
Part 5 — Update the Privacy Policy
With AdSense and Analytics active, the privacy policy needs to mention the use of third-party cookies. The /privacy/ page already exists on this blog — add a new section 2.4 (or equivalent) with the following content:
| |
This blog already has
/privacy/and/terms/linked in the footer. After editing, the content complies with the AdSense Program Policies and with the LGPD (Brazilian Law No. 13,709/2018).
Part 6 — Test locally
Check that the scripts do NOT appear in development
| |
Open http://localhost:1313, press Ctrl+U and confirm that there is no reference to googletagmanager or pagead2 in the HTML. ✅
Simulate the production environment locally
| |
Now the scripts should appear in the HTML (the env = "development" override is ignored because you forced production). Confirm with Ctrl+U.
Validate the final build
| |
Examine public/index.html and confirm the scripts are present in the <head>.
Part 7 — Complete validation checklist
Run each item after publishing to production:
Search Console
- Property verified — status “Verified” in the panel
- Sitemap submitted — status “Success” with URL count
-
robots.txtaccessible athttps://seudominio.com.br/robots.txtwithoutDisallow: / - URL Inspection on at least 3 articles — all with status “URL is on Google” or “Request indexing” triggered
Google Analytics 4
- “Realtime” report shows activity when browsing the blog in production
- ID
G-XXXXXXXXXXappears in the HTML<head>in production - ID does not appear in the HTML in local development (
hugo server) - Search Console linked to GA4 (under Admin → Product links)
Google AdSense
- Snippet
ca-pub-XXXXXXXXXXXXXXXXXappears in the<head>in production - Snippet does not appear in local development
- Tax information and address filled in on the AdSense panel
-
ads.txtaccessible athttps://seudominio.com.br/ads.txtwith the linegoogle.com, pub-XXXXXXXXXXXXXXXX, DIRECT, f08c47fec0942fa0 - Review requested in the AdSense panel after publishing the code
- In-Article unit created in the panel — slot ID filled in
googleAdSenseInArticleSlot - Display unit created in the panel — slot ID filled in
googleAdSenseDisplaySlot - In-Article ad appears after the 4th paragraph in posts with ≥ 4 paragraphs
- Display ad appears before the comments
Privacy and compliance
-
/privacy/page mentions Google Analytics and Google AdSense -
/privacy/page contains a link tohttps://www.google.com/settings/ads - Privacy Policy accessible in the blog footer ✅ (already exists)
Security
- HTTPS active and certificate valid (padlock in the browser)
-
extend_head.htmlusesif eq .Site.Params.env "production"so nothing leaks in dev
Part 8 — SEO good practices to amplify the results
With Search Console active, the practices below have a direct, measurable impact:
description on every post
PaperMod uses the front matter description field as <meta name="description">. Google shows this text in search results:
| |
Descriptive alt on every image
Google indexes images. Always fill it in:
| |
keywords to reinforce the topic
PaperMod supports the keywords field in the front matter (rendered as a meta tag):
| |
Friendly slug
Use descriptive slugs without unnecessary stop words:
| |
Structured data (Schema.org)
PaperMod already injects automatically:
Articlewith author, date and headlineBreadcrumbListfor navigation
Check it at search.google.com/test/rich-results by pasting the URL of any article.
Core Web Vitals
In Search Console, follow “Page experience → Core Web Vitals”. For a static Hugo blog, scores are usually excellent by default. The main causes of regression are:
| Metric | Common cause | Solution |
|---|---|---|
| LCP (Largest Contentful Paint) | Cover image too large | Use .webp ≤ 150 KB |
| CLS (Cumulative Layout Shift) | Images without width/height | Always set dimensions |
| INP (Interaction to Next Paint) | Blocking third-party scripts | async mandatory for AdSense ✅ |
Conclusion
Summary of what was configured:
| Tool | File modified | What you gain |
|---|---|---|
| Search Console | hugo.toml ([params.analytics.google]) | Guaranteed indexing, organic keywords, error alerts |
| GA4 | hugo.toml ([services.googleAnalytics]) + config/development/hugo.toml | Sessions, unique users, popular pages, traffic source |
| AdSense | hugo.toml (googleAdSense + slots) + layouts/partials/extend_head.html + adsense-inarticle.html + adsense-display.html + layouts/_default/single.html | Passive revenue with controlled placement |
| Privacy | content/privacy/index.md | Compliance with LGPD and the AdSense Policies |
The virtuous cycle: good SEO → more organic traffic → more data in Analytics → more revenue in AdSense.
AdSense approval can take weeks; use that time to publish more content, fix any Search Console alerts and optimize Core Web Vitals. As traffic grows, the ecosystem feeds itself.
Any questions, leave a comment below. 🚀
By commenting, you agree to our Privacy Policy, Terms of Use, Data Deletion Policy.