Introduction

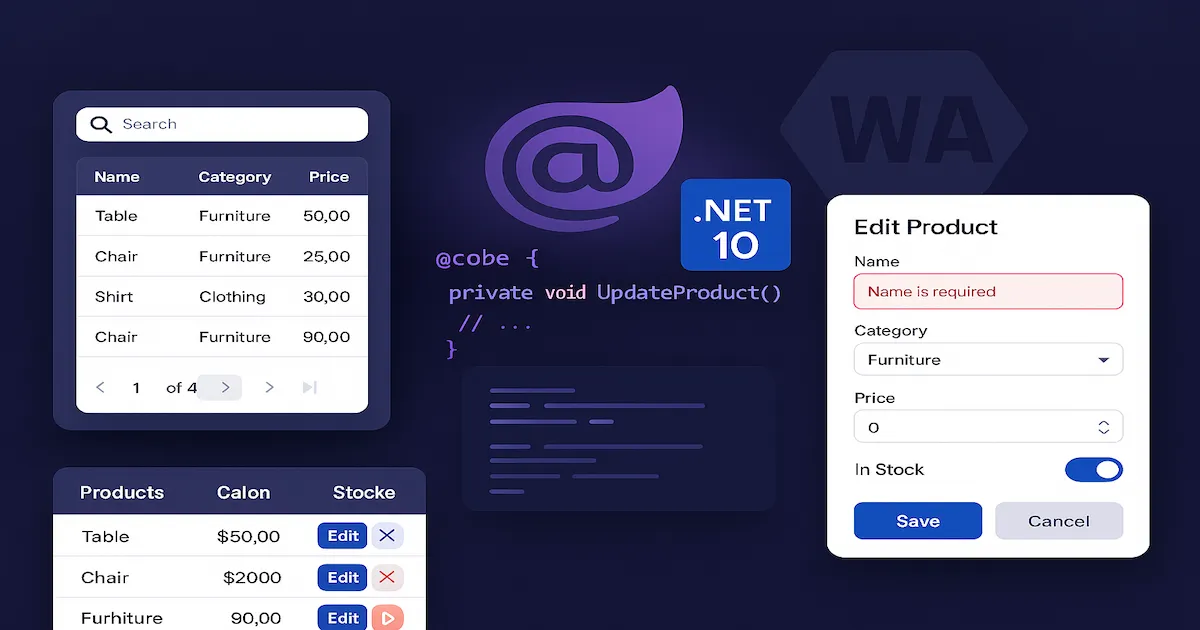
In the previous article in this series, I analyzed whether Blazor WebAssembly is ready for enterprise production by comparing it with Angular. The conclusion was nuanced — Blazor WASM is viable for internal enterprise scenarios, but it has trade-offs that must be evaluated case by case. Today I will prove it in practice by building a full product CRUD with a paginated DataGrid, forms with validation, dialogs, notifications and inline editing — all in C#, without writing a single line of JavaScript.

The UI component library I chose is Radzen Blazor, an open source library (MIT license) with more than 70 free components. The main reason: Radzen delivers a mature visual experience for enterprise CRUD scenarios, with DataGrid, forms, validation, dialogs and notifications ready to use. The JavaScript that runs internally (Radzen.Blazor.js) belongs to the library itself — the developer never touches JS directly.

What I will build in this tutorial:

  • REST API with Minimal API for Products and Categories (10 endpoints)
  • Standalone Blazor WASM consuming the API via HttpClient
  • Paginated DataGrid with search, ordering and per-row actions
  • Reusable dialog form for creation and editing
  • Inline editing for Categories (an alternative pattern to the dialog)
  • Deletion with confirmation and visual notifications

All the code is in the blog-zocateli-sample repository on GitHub. The idea is that you clone it, run it and form your own opinion. This article is the 2nd in the “Frontend Moderno” series — my goal is to show that the Blazor component ecosystem already supports real production scenarios, with a development experience familiar to anyone coming from .NET.

ℹ️ Info: Radzen Blazor is open source (MIT) and includes 70+ free components. Radzen.Blazor.js is the library’s internal JavaScript — the developer never writes JavaScript directly. The version used in this tutorial is 10.2.0 with .NET 10.


Prerequisites

To follow this tutorial, you will need:

  • .NET 10 SDK (10.0.201 or later) — official download
  • IDE: VS Code with the C# Dev Kit extension, or Visual Studio 2022 17.14+
  • Basic knowledge of C# and REST APIs
  • A terminal (PowerShell, bash or zsh)

Clone the repository with all the code ready:

1
2
git clone https://github.com/lzocateli/blog-zocateli-sample.git
cd blog-zocateli-sample

Check that the SDK is installed:

1
dotnet --version

Expected output:

1
10.0.201

💡 Tip: If you use VS Code with Dev Containers, the repository’s .devcontainer/ already has the .NET 10 SDK configured. Just open the project in the container and everything will be ready.


Creating the Standalone Blazor WASM Project

The .NET blazorwasm template creates a Standalone Blazor WebAssembly application — a SPA that runs entirely in the browser via WebAssembly, with no ASP.NET Core server hosting it. Unlike the Hosted model (which includes a Server project), Standalone is a pure SPA that consumes external APIs over HTTP, exactly like an Angular or React application.

Project scaffolding

1
2
3
dotnet new blazorwasm --name BlogSamples.BlazorWasm --output frontend/blazor-wasm --framework net10.0
dotnet sln add frontend/blazor-wasm
dotnet add frontend/blazor-wasm package Radzen.Blazor

The first command creates the project, the second adds it to the solution and the third installs Radzen Blazor — the UI component library. The resulting .csproj stays lean:

 1
 2
 3
 4
 5
 6
 7
 8
 9
10
11
12
<Project Sdk="Microsoft.NET.Sdk.BlazorWebAssembly">
  <PropertyGroup>
    <TargetFramework>net10.0</TargetFramework>
    <Nullable>enable</Nullable>
    <ImplicitUsings>enable</ImplicitUsings>
  </PropertyGroup>
  <ItemGroup>
    <PackageReference Include="Microsoft.AspNetCore.Components.WebAssembly" Version="10.0.5" />
    <PackageReference Include="Microsoft.AspNetCore.Components.WebAssembly.DevServer" Version="10.0.5" PrivateAssets="all" />
    <PackageReference Include="Radzen.Blazor" Version="10.2.0" />
  </ItemGroup>
</Project>

Configuring Program.cs

Program.cs is the SPA’s entry point. Here I configure HttpClient with the API base URL (via appsettings.json), register the typed HTTP services and add the Radzen components:

 1
 2
 3
 4
 5
 6
 7
 8
 9
10
11
12
13
14
15
16
17
18
19
20
21
22
using Microsoft.AspNetCore.Components.Web;
using Microsoft.AspNetCore.Components.WebAssembly.Hosting;
using BlogSamples.BlazorWasm;
using BlogSamples.BlazorWasm.Services;
using Radzen;

var builder = WebAssemblyHostBuilder.CreateDefault(args);
builder.RootComponents.Add<App>("#app");
builder.RootComponents.Add<HeadOutlet>("head::after");

// Configure HttpClient with the API base URL
var apiBaseUrl = builder.Configuration["ApiBaseUrl"] ?? "http://localhost:5101";
builder.Services.AddScoped(sp => new HttpClient { BaseAddress = new Uri(apiBaseUrl) });

// Typed HTTP services
builder.Services.AddScoped<ProdutoApiService>();
builder.Services.AddScoped<CategoriaApiService>();

// Radzen Components (DialogService, NotificationService, etc.)
builder.Services.AddRadzenComponents();

await builder.Build().RunAsync();

The AddRadzenComponents() call automatically registers DialogService, NotificationService, TooltipService and ContextMenuService in the DI container. Without it, dialogs and notifications do not work.

Layout with Radzen

MainLayout.razor defines the application’s visual structure — a header with a sidebar toggle, side navigation with RadzenPanelMenu, a content area and a footer:

 1
 2
 3
 4
 5
 6
 7
 8
 9
10
11
12
13
14
15
16
17
18
19
20
21
22
23
24
25
26
27
28
29
30
31
32
33
34
35
36
37
@inherits LayoutComponentBase

<RadzenLayout>
    <RadzenHeader>
        <RadzenStack Orientation="Orientation.Horizontal" AlignItems="AlignItems.Center"
                     Gap="0.5rem" class="rz-p-2">
            <RadzenSidebarToggle Click="@(() => sidebarExpanded = !sidebarExpanded)" />
            <RadzenText Text="Blog Samples — Blazor WASM" TextStyle="TextStyle.H5"
                        class="rz-m-0" />
        </RadzenStack>
    </RadzenHeader>

    <RadzenSidebar @bind-Expanded="@sidebarExpanded">
        <RadzenPanelMenu>
            <RadzenPanelMenuItem Text="Dashboard" Icon="dashboard" Path="/" />
            <RadzenPanelMenuItem Text="Produtos" Icon="inventory_2" Path="/produtos" />
            <RadzenPanelMenuItem Text="Categorias" Icon="category" Path="/categorias" />
        </RadzenPanelMenu>
    </RadzenSidebar>

    <RadzenBody>
        <div class="rz-p-4">
            @Body
        </div>
    </RadzenBody>

    <RadzenFooter>
        <RadzenText Text="© 2026 Blog Samples — zocate.li" TextStyle="TextStyle.Caption"
                    class="rz-p-2" />
    </RadzenFooter>
</RadzenLayout>

<RadzenComponents />

@code {
    bool sidebarExpanded = true;
}

The <RadzenComponents /> component at the end is mandatory — it renders the containers for dialogs, notifications and tooltips. Without it, DialogService.OpenAsync() and NotificationService.Notify() display nothing on screen.

⚠️ Warning: <RadzenComponents /> must be inside the layout, not in App.razor. Placing it outside the layout can cause rendering problems with dialogs and notifications.

For the visual theme to work, App.razor needs to include <RadzenTheme Theme="material" />:

1
2
3
4
<RadzenTheme Theme="material" />
<Router AppAssembly="typeof(Program).Assembly">
    <!-- ... -->
</Router>

Radzen’s material theme includes all the necessary styling — colors, typography, spacing, Material Design icons. There is no need to import Bootstrap or any other CSS framework.


The REST API — Products Domain

For Blazor WASM to consume data, I created a Products domain with Minimal API in the main project. There are 10 endpoints organized in two groups:

VerbRouteDescription
GET/api/produtos?pagina=1&tamanhoPagina=20&filtro=List with pagination and filter
GET/api/produtos/{id}Get by ID
POST/api/produtosCreate product
PUT/api/produtos/{id}Update product
DELETE/api/produtos/{id}Remove product
GET/api/categoriasList all
GET/api/categorias/{id}Get by ID
POST/api/categoriasCreate category
PUT/api/categorias/{id}Update category
DELETE/api/categorias/{id}Remove category

ProdutoEndpoints.cs uses MapGroup to organize the routes and ProducesResponseType to document them in Swagger:

 1
 2
 3
 4
 5
 6
 7
 8
 9
10
11
12
13
14
15
16
17
18
19
20
21
22
23
24
25
26
27
28
29
30
31
public static class ProdutoEndpoints
{
    public static void MapProdutoEndpoints(this IEndpointRouteBuilder app)
    {
        var produtos = app.MapGroup("/api/produtos")
            .WithTags("Produtos");

        produtos.MapGet("/", async (
            IProdutoService service,
            int pagina = 1,
            int tamanhoPagina = 20,
            string? filtro = null) =>
        {
            var resultado = await service.ListarProdutosAsync(pagina, tamanhoPagina, filtro);
            return Results.Ok(resultado);
        })
        .WithName("ListarProdutos")
        .Produces<PagedResult<ProdutoDto>>();

        produtos.MapPost("/", async (CriarProdutoRequest request, IProdutoService service) =>
        {
            var produto = await service.CriarProdutoAsync(request);
            return Results.CreatedAtRoute("ObterProduto", new { id = produto.Id }, produto);
        })
        .WithName("CriarProduto")
        .Produces<ProdutoDto>(201)
        .ProducesValidationProblem();

        // ... PUT, DELETE, and Categorias endpoints follow the same pattern
    }
}

The request DTOs use DataAnnotations for server-side validation, ensuring the API validates the data even if the client side is bypassed:

 1
 2
 3
 4
 5
 6
 7
 8
 9
10
11
12
13
14
15
16
17
18
19
public record CriarProdutoRequest
{
    [Required(ErrorMessage = "Nome é obrigatório")]
    [StringLength(200, MinimumLength = 3)]
    public string Nome { get; init; } = string.Empty;

    public string? Descricao { get; init; }

    [Range(0.01, double.MaxValue, ErrorMessage = "Preço deve ser maior que zero")]
    public decimal Preco { get; init; }

    [Range(0, int.MaxValue)]
    public int QuantidadeEstoque { get; init; }

    [Range(1, int.MaxValue, ErrorMessage = "Selecione uma categoria")]
    public int CategoriaId { get; init; }

    public bool Ativo { get; init; } = true;
}

The service implementation uses a ConcurrentDictionary as in-memory storage (a design decision to keep the tutorial focused on Blazor WASM, with no database dependency). The initial seed includes 8 categories and more than 50 products distributed among them.

CORS configuration

Since Standalone Blazor WASM runs on a different port from the API (5200 vs 5101), it is mandatory to configure CORS in the API’s Program.cs:

 1
 2
 3
 4
 5
 6
 7
 8
 9
10
11
12
builder.Services.AddCors(options =>
{
    options.AddPolicy("BlazorWasm", policy =>
    {
        policy.WithOrigins("http://localhost:5200", "https://localhost:7200")
              .AllowAnyHeader()
              .AllowAnyMethod();
    });
});

// In the pipeline:
app.UseCors("BlazorWasm");

💡 Tip: Configuring CORS is mandatory for Standalone Blazor WASM. Without explicit configuration, the browser will block cross-origin requests. In production, replace the origins with real domains.

To test the API in isolation, run dotnet run --project src/BlogSamples and open http://localhost:5101/docs — Swagger shows all the Products and Categories endpoints.

The diagram below shows the full architecture — Blazor WASM in the browser communicates with the REST API via HttpClient (JSON) across the CORS barrier:
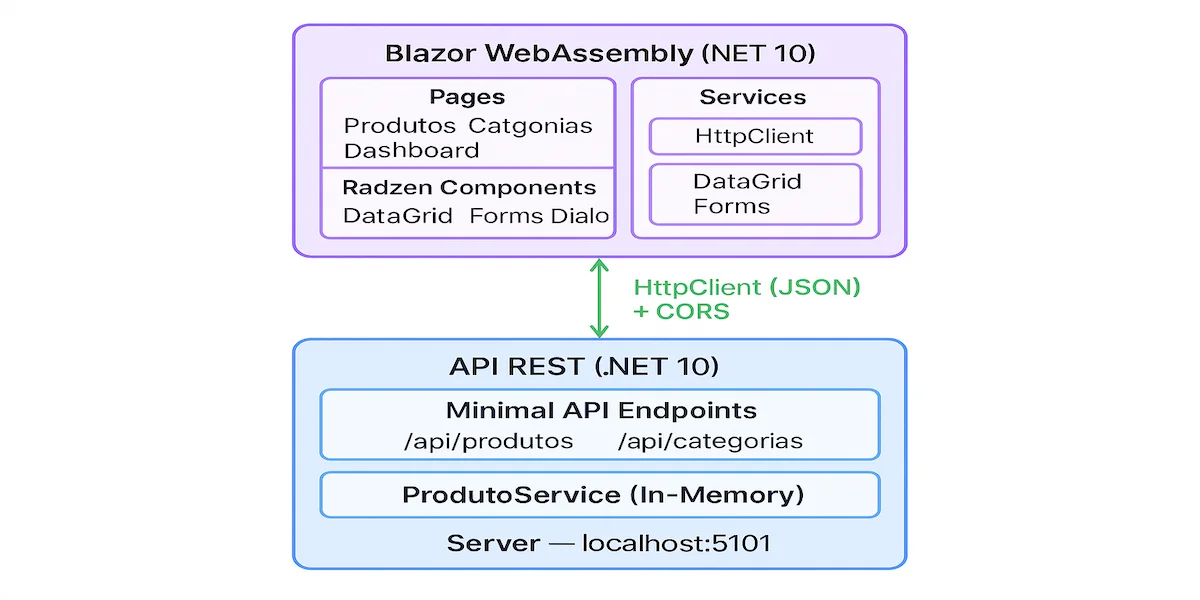
Architecture diagram showing Blazor WASM communicating with a REST API via HttpClient and CORS


HTTP Services — Consuming the API

The pattern I use to consume the API is a typed service with HttpClient injected via a primary constructor. Each service encapsulates the HTTP calls for a specific domain, using the System.Net.Http.Json extension methods — GetFromJsonAsync, PostAsJsonAsync and PutAsJsonAsync:

 1
 2
 3
 4
 5
 6
 7
 8
 9
10
11
12
13
14
15
16
17
18
19
20
21
22
23
24
25
26
27
28
29
30
31
32
33
34
35
36
37
38
39
40
41
using System.Net.Http.Json;
using BlogSamples.BlazorWasm.Models;

namespace BlogSamples.BlazorWasm.Services;

public class ProdutoApiService(HttpClient http)
{
    public async Task<PagedResult<ProdutoDto>> ListarAsync(
        int pagina = 1, int tamanhoPagina = 20, string? filtro = null)
    {
        var url = $"api/produtos?pagina={pagina}&tamanhoPagina={tamanhoPagina}";
        if (!string.IsNullOrWhiteSpace(filtro))
            url += $"&filtro={Uri.EscapeDataString(filtro)}";

        return await http.GetFromJsonAsync<PagedResult<ProdutoDto>>(url)
            ?? new PagedResult<ProdutoDto>();
    }

    public async Task<ProdutoDto?> ObterPorIdAsync(int id)
        => await http.GetFromJsonAsync<ProdutoDto>($"api/produtos/{id}");

    public async Task<ProdutoDto?> CriarAsync(CriarProdutoRequest request)
    {
        var response = await http.PostAsJsonAsync("api/produtos", request);
        response.EnsureSuccessStatusCode();
        return await response.Content.ReadFromJsonAsync<ProdutoDto>();
    }

    public async Task<ProdutoDto?> AtualizarAsync(int id, AtualizarProdutoRequest request)
    {
        var response = await http.PutAsJsonAsync($"api/produtos/{id}", request);
        response.EnsureSuccessStatusCode();
        return await response.Content.ReadFromJsonAsync<ProdutoDto>();
    }

    public async Task RemoverAsync(int id)
    {
        var response = await http.DeleteAsync($"api/produtos/{id}");
        response.EnsureSuccessStatusCode();
    }
}

Some important points about this pattern:

  • Uri.EscapeDataString on the filter prevents parameter injection in the query string. Never concatenate strings directly into URLs without encoding.
  • EnsureSuccessStatusCode() throws HttpRequestException if the API returns an error (4xx, 5xx). In the Blazor component, I catch this exception to show an error notification to the user.
  • Primary constructor (HttpClient http) avoids the field + constructor boilerplate. HttpClient is resolved by the DI container with the BaseAddress configured in Program.cs.

CategoriaApiService follows exactly the same pattern, with ListarAsync, CriarAsync, AtualizarAsync and RemoverAsync methods.

In Angular, HttpClient with interceptors and RxJS operators offers similar ergonomics. In Blazor, the experience is equivalent — DelegatingHandler serves as an interceptor for authentication, logging or retry. The main difference is that Blazor uses C#’s native async/await instead of RxJS Observable.

ℹ️ Info: The Blazor WASM models are classes (not records). Radzen Blazor uses two-way binding (@bind-Value), which requires mutable setters. Records with init do not work for editing in Radzen forms.


Product DataGrid with Radzen

RadzenDataGrid is the central component of this tutorial. It supports server-side pagination, sorting, filtering, custom per-column templates and direct integration with the LoadData pattern — a callback the grid calls every time it needs new data (when changing page, sorting or filtering).

Here is the complete Produtos.razor — I will explain each part:

 1
 2
 3
 4
 5
 6
 7
 8
 9
10
11
12
13
14
15
16
17
18
19
20
21
22
23
24
25
26
27
28
29
30
31
32
33
34
35
36
37
38
39
40
41
42
43
44
45
46
47
48
49
50
51
52
53
54
55
56
57
58
59
60
61
@page "/produtos"

<PageTitle>Produtos — Blog Samples</PageTitle>

<RadzenText TextStyle="TextStyle.H3" class="rz-mb-4">Produtos</RadzenText>

<RadzenStack Orientation="Orientation.Horizontal" AlignItems="AlignItems.Center"
             Gap="1rem" class="rz-mb-4">
    <RadzenTextBox Placeholder="Buscar produtos..." @bind-Value="filtro"
                   Change="@OnFiltroChanged" Style="width: 300px;" />
    <RadzenButton Text="Novo Produto" Icon="add" ButtonStyle="ButtonStyle.Primary"
                  Click="@(() => AbrirFormulario(null))" />
</RadzenStack>

<RadzenDataGrid @ref="grid" TItem="ProdutoDto"
                Data="@produtos" Count="@totalRegistros"
                LoadData="@CarregarDados"
                AllowPaging="true" PageSize="20"
                AllowSorting="true"
                PagerHorizontalAlign="HorizontalAlign.Center"
                IsLoading="@isLoading"
                Style="width: 100%;">
    <Columns>
        <RadzenDataGridColumn TItem="ProdutoDto" Property="Id" Title="ID"
                              Width="70px" TextAlign="TextAlign.Center" Sortable="false" />

        <RadzenDataGridColumn TItem="ProdutoDto" Property="Nome" Title="Nome"
                              MinWidth="200px" />

        <RadzenDataGridColumn TItem="ProdutoDto" Property="CategoriaNome" Title="Categoria"
                              Width="150px" />

        <RadzenDataGridColumn TItem="ProdutoDto" Property="Preco" Title="Preço"
                              Width="130px" TextAlign="TextAlign.End"
                              FormatString="{0:C2}" />

        <RadzenDataGridColumn TItem="ProdutoDto" Property="QuantidadeEstoque" Title="Estoque"
                              Width="100px" TextAlign="TextAlign.Center" />

        <RadzenDataGridColumn TItem="ProdutoDto" Property="Ativo" Title="Status"
                              Width="100px" TextAlign="TextAlign.Center" Sortable="false">
            <Template Context="produto">
                <RadzenBadge BadgeStyle="@(produto.Ativo ? BadgeStyle.Success : BadgeStyle.Light)"
                             Text="@(produto.Ativo ? "Ativo" : "Inativo")" />
            </Template>
        </RadzenDataGridColumn>

        <RadzenDataGridColumn TItem="ProdutoDto" Title="Ações" Width="140px"
                              TextAlign="TextAlign.Center" Sortable="false">
            <Template Context="produto">
                <RadzenButton Icon="edit" ButtonStyle="ButtonStyle.Light"
                              Size="ButtonSize.Small"
                              Click="@(() => AbrirFormulario(produto.Id))"
                              class="rz-mr-1" />
                <RadzenButton Icon="delete" ButtonStyle="ButtonStyle.Danger"
                              Size="ButtonSize.Small"
                              Click="@(() => ConfirmarExclusao(produto))" />
            </Template>
        </RadzenDataGridColumn>
    </Columns>
</RadzenDataGrid>

Let me detail the key points:

  • LoadData="@CarregarDados" — the grid calls this callback on initialization, when changing page and when sorting. It receives LoadDataArgs with Skip, Top and ordering information. This is the key to server-side pagination.
  • Data + Count — Data receives the current page of items; Count reports the total number of records. The grid calculates the number of pages automatically.
  • FormatString="{0:C2}" — formats the price as currency. Blazor WASM uses the culture configured in the browser, so in pt-BR it displays “R$ 1.299,00”.
  • Template — custom columns. I use RadzenBadge to display the status as a green/gray badge and action buttons (Edit, Delete) with Material Design icons.
  • IsLoading — shows a spinner while the API is being called. It significantly improves UX on slow connections.

The @code block contains the logic:

 1
 2
 3
 4
 5
 6
 7
 8
 9
10
11
12
13
14
15
16
17
18
19
20
21
22
23
24
25
26
27
28
29
30
31
@code {
    RadzenDataGrid<ProdutoDto> grid = default!;
    IEnumerable<ProdutoDto> produtos = [];
    int totalRegistros;
    string? filtro;
    bool isLoading;

    [Inject] ProdutoApiService ProdutoService { get; set; } = default!;
    [Inject] DialogService DialogService { get; set; } = default!;
    [Inject] NotificationService NotificationService { get; set; } = default!;

    async Task CarregarDados(LoadDataArgs args)
    {
        isLoading = true;

        var pagina = (args.Skip ?? 0) / (args.Top ?? 20) + 1;
        var tamanhoPagina = args.Top ?? 20;

        var resultado = await ProdutoService.ListarAsync(pagina, tamanhoPagina, filtro);

        produtos = resultado.Itens;
        totalRegistros = resultado.TotalRegistros;

        isLoading = false;
    }

    async Task OnFiltroChanged()
    {
        await grid.FirstPage(true);
    }
}

The CarregarDados method converts Skip/Top (Radzen’s pattern) to pagina/tamanhoPagina (my API’s pattern). When the user types in the search field, OnFiltroChanged goes back to the first page with grid.FirstPage(true) — the true forces the reload that calls CarregarDados again with the updated filter.

⚠️ Warning: The RadzenDataGrid LoadData event is called every time the grid needs data — paging, sorting, filtering. Do not confuse it with direct Data binding, which is for client-side data. If you use Data with a complete list and AllowPaging, pagination will be client-side (all data loaded at once). With LoadData + Count, pagination is server-side (only the current page is loaded).


Creation and Edit Form

ProdutoForm.razor is a reusable component that serves both to create and to edit products. The distinction is made by the ProdutoId Parameter: if it is null, it is creation; if it has a value, it is editing. The form is opened in a modal dialog via DialogService.OpenAsync<ProdutoForm>().

 1
 2
 3
 4
 5
 6
 7
 8
 9
10
11
12
13
14
15
16
17
18
19
20
21
22
23
24
25
26
27
28
29
30
31
32
33
34
35
36
37
38
39
40
41
42
43
44
45
46
47
48
49
50
51
52
53
54
55
56
57
58
59
60
61
62
63
64
65
66
67
68
69
70
71
72
73
74
<RadzenTemplateForm TItem="CriarProdutoRequest" Data="@model" Submit="@OnSubmit">
    <RadzenStack Gap="1rem">
        <RadzenFormField Text="Nome" Variant="Variant.Outlined">
            <ChildContent>
                <RadzenTextBox @bind-Value="model.Nome" MaxLength="200" />
            </ChildContent>
            <Helper>
                <RadzenRequiredValidator Component="Nome"
                                         Text="Nome é obrigatório" />
            </Helper>
        </RadzenFormField>

        <RadzenFormField Text="Descrição" Variant="Variant.Outlined">
            <ChildContent>
                <RadzenTextArea @bind-Value="model.Descricao" Rows="3" />
            </ChildContent>
        </RadzenFormField>

        <RadzenRow Gap="1rem">
            <RadzenColumn Size="6">
                <RadzenFormField Text="Preço (R$)" Variant="Variant.Outlined"
                                Style="width: 100%;">
                    <ChildContent>
                        <RadzenNumeric TValue="decimal" @bind-Value="model.Preco"
                                       Min="0.01m" Format="N2" />
                    </ChildContent>
                    <Helper>
                        <RadzenNumericRangeValidator Component="Preco" Min="0.01"
                                                     Text="Preço deve ser maior que zero" />
                    </Helper>
                </RadzenFormField>
            </RadzenColumn>
            <RadzenColumn Size="6">
                <RadzenFormField Text="Estoque" Variant="Variant.Outlined"
                                Style="width: 100%;">
                    <ChildContent>
                        <RadzenNumeric TValue="int" @bind-Value="model.QuantidadeEstoque"
                                       Min="0" />
                    </ChildContent>
                </RadzenFormField>
            </RadzenColumn>
        </RadzenRow>

        <RadzenFormField Text="Categoria" Variant="Variant.Outlined">
            <ChildContent>
                <RadzenDropDown TValue="int" @bind-Value="model.CategoriaId"
                                Data="@categorias" TextProperty="Nome"
                                ValueProperty="Id"
                                Placeholder="Selecione uma categoria..."
                                AllowFiltering="true" />
            </ChildContent>
            <Helper>
                <RadzenRequiredValidator Component="CategoriaId"
                                         Text="Selecione uma categoria"
                                         DefaultValue="0" />
            </Helper>
        </RadzenFormField>

        <RadzenStack Orientation="Orientation.Horizontal" AlignItems="AlignItems.Center"
                     Gap="0.5rem">
            <RadzenSwitch @bind-Value="model.Ativo" />
            <RadzenText Text="@(model.Ativo ? "Ativo" : "Inativo")" />
        </RadzenStack>

        <RadzenStack Orientation="Orientation.Horizontal"
                     JustifyContent="JustifyContent.End" Gap="0.5rem">
            <RadzenButton Text="Cancelar" ButtonStyle="ButtonStyle.Light"
                          Click="@(() => DialogService.Close(false))"
                          ButtonType="ButtonType.Button" />
            <RadzenButton Text="Salvar" ButtonStyle="ButtonStyle.Primary"
                          ButtonType="ButtonType.Submit" Icon="save" />
        </RadzenStack>
    </RadzenStack>
</RadzenTemplateForm>

Let me highlight the most important points of the form:

  • RadzenTemplateForm<CriarProdutoRequest> — wraps the whole form with validation. The Submit event only fires if all validators pass.
  • RadzenRequiredValidator and RadzenNumericRangeValidator — client-side validation with automatic visual feedback (red borders, error message below the field). Server-side validation via DataAnnotations in the API is the second layer of protection.
  • RadzenDropDown<int> for categories — Data receives the list, TextProperty and ValueProperty map the DTO properties. AllowFiltering="true" enables inline search in the dropdown (useful when there are many categories).
  • RadzenSwitch with a dynamic label — displays “Ativo” or “Inativo” according to the toggle state.
  • Cancel button with ButtonType="ButtonType.Button" — without it, clicking Cancel triggers the form submit.

The @code block contains the initialization and submit logic:

 1
 2
 3
 4
 5
 6
 7
 8
 9
10
11
12
13
14
15
16
17
18
19
20
21
22
23
24
25
26
27
28
29
30
31
32
33
34
35
36
37
38
39
40
41
42
43
44
45
46
47
48
49
50
51
52
53
54
55
56
57
58
59
60
61
62
63
64
65
66
67
68
69
@code {
    [Parameter] public int? ProdutoId { get; set; }

    [Inject] ProdutoApiService ProdutoService { get; set; } = default!;
    [Inject] CategoriaApiService CategoriaService { get; set; } = default!;
    [Inject] DialogService DialogService { get; set; } = default!;
    [Inject] NotificationService NotificationService { get; set; } = default!;

    CriarProdutoRequest model = new();
    IReadOnlyList<CategoriaDto> categorias = [];

    protected override async Task OnInitializedAsync()
    {
        categorias = await CategoriaService.ListarAsync();

        if (ProdutoId.HasValue)
        {
            var produto = await ProdutoService.ObterPorIdAsync(ProdutoId.Value);
            if (produto is not null)
            {
                model = new CriarProdutoRequest
                {
                    Nome = produto.Nome,
                    Descricao = produto.Descricao,
                    Preco = produto.Preco,
                    QuantidadeEstoque = produto.QuantidadeEstoque,
                    CategoriaId = produto.CategoriaId,
                    Ativo = produto.Ativo
                };
            }
        }
    }

    async Task OnSubmit()
    {
        try
        {
            if (ProdutoId.HasValue)
            {
                var request = new AtualizarProdutoRequest
                {
                    Nome = model.Nome,
                    Descricao = model.Descricao,
                    Preco = model.Preco,
                    QuantidadeEstoque = model.QuantidadeEstoque,
                    CategoriaId = model.CategoriaId,
                    Ativo = model.Ativo
                };
                await ProdutoService.AtualizarAsync(ProdutoId.Value, request);
            }
            else
            {
                await ProdutoService.CriarAsync(model);
            }

            DialogService.Close(true);
        }
        catch (HttpRequestException)
        {
            NotificationService.Notify(new NotificationMessage
            {
                Severity = NotificationSeverity.Error,
                Summary = "Erro ao salvar",
                Detail = "Não foi possível salvar o produto.",
                Duration = 6000
            });
        }
    }
}

The complete flow is: the user clicks “Novo Produto” → DialogService.OpenAsync<ProdutoForm>() opens the dialog → the form loads the categories and, when editing, loads the product → the user fills in/edits → validators check → OnSubmit calls the API → DialogService.Close(true) closes the dialog → the grid detects resultado is true and calls grid.Reload() → data updated.

To open the dialog from Produtos.razor:

 1
 2
 3
 4
 5
 6
 7
 8
 9
10
11
12
13
14
15
16
17
18
async Task AbrirFormulario(int? produtoId)
{
    var titulo = produtoId.HasValue ? "Editar Produto" : "Novo Produto";

    var resultado = await DialogService.OpenAsync<ProdutoForm>(titulo,
        new Dictionary<string, object?> { { "ProdutoId", produtoId } },
        new DialogOptions
        {
            Width = "600px",
            CloseDialogOnOverlayClick = false,
            CloseDialogOnEsc = true
        });

    if (resultado is true)
    {
        await grid.Reload();
    }
}

The { "ProdutoId", produtoId } dictionary passes the parameter to the ProdutoForm component. DialogOptions controls the dialog width and whether it closes when clicking outside or pressing Escape.

📝 Example: Edit flow — click a product’s “Editar” button → the dialog opens with the title “Editar Produto” → fields filled with current data → change the price → click Salvar → green notification “Produto atualizado” → the grid reloads with the new price.


Deletion with Confirmation and Notifications

Every destructive operation should have a confirmation step. Radzen’s DialogService.Confirm() renders a native dialog with customizable buttons:

 1
 2
 3
 4
 5
 6
 7
 8
 9
10
11
12
13
14
15
16
17
18
19
20
21
22
23
24
25
26
27
28
29
30
31
32
33
34
35
36
37
async Task ConfirmarExclusao(ProdutoDto produto)
{
    var confirmado = await DialogService.Confirm(
        $"Deseja excluir o produto \"{produto.Nome}\"?",
        "Confirmar Exclusão",
        new ConfirmOptions
        {
            OkButtonText = "Excluir",
            CancelButtonText = "Cancelar"
        });

    if (confirmado == true)
    {
        try
        {
            await ProdutoService.RemoverAsync(produto.Id);
            NotificationService.Notify(new NotificationMessage
            {
                Severity = NotificationSeverity.Success,
                Summary = "Produto excluído",
                Detail = $"\"{produto.Nome}\" foi removido com sucesso.",
                Duration = 4000
            });
            await grid.Reload();
        }
        catch (HttpRequestException)
        {
            NotificationService.Notify(new NotificationMessage
            {
                Severity = NotificationSeverity.Error,
                Summary = "Erro ao excluir",
                Detail = "Não foi possível excluir o produto. Tente novamente.",
                Duration = 6000
            });
        }
    }
}

Radzen notifications (NotificationService.Notify) appear as toasts in the corner of the screen. I use NotificationSeverity.Success with a 4-second duration for successful operations and NotificationSeverity.Error with 6 seconds for errors — more time for the user to read the message. The try/catch pattern with HttpRequestException is simple but effective: if the API returns an error (e.g. product not found), the catch shows immediate feedback to the user.


Category Management — Inline Editing

To demonstrate an alternative pattern to the dialog, the Categories screen uses inline editing — the user edits directly in the grid, without opening a modal. This approach works well for simple entities with few fields.

 1
 2
 3
 4
 5
 6
 7
 8
 9
10
11
12
13
14
15
16
17
18
19
20
21
22
23
24
25
26
27
28
29
30
31
32
33
34
35
36
37
38
39
40
41
42
43
44
45
46
47
48
49
50
51
52
53
54
55
56
57
@page "/categorias"

<RadzenDataGrid @ref="grid" TItem="CategoriaDto"
                Data="@categorias" AllowSorting="true"
                EditMode="DataGridEditMode.Single"
                RowUpdate="@OnRowUpdate" RowCreate="@OnRowCreate"
                Style="width: 100%;">
    <Columns>
        <RadzenDataGridColumn TItem="CategoriaDto" Property="Id" Title="ID"
                              Width="70px" TextAlign="TextAlign.Center" />

        <RadzenDataGridColumn TItem="CategoriaDto" Property="Nome" Title="Nome"
                              MinWidth="200px">
            <EditTemplate Context="cat">
                <RadzenTextBox @bind-Value="cat.Nome" Style="width: 100%;" />
            </EditTemplate>
        </RadzenDataGridColumn>

        <RadzenDataGridColumn TItem="CategoriaDto" Property="Descricao"
                              Title="Descrição" MinWidth="250px">
            <EditTemplate Context="cat">
                <RadzenTextBox @bind-Value="cat.Descricao" Style="width: 100%;" />
            </EditTemplate>
        </RadzenDataGridColumn>

        <RadzenDataGridColumn TItem="CategoriaDto" Property="Ativo" Title="Status"
                              Width="100px" TextAlign="TextAlign.Center">
            <Template Context="cat">
                <RadzenBadge BadgeStyle="@(cat.Ativo ? BadgeStyle.Success : BadgeStyle.Light)"
                             Text="@(cat.Ativo ? "Ativo" : "Inativo")" />
            </Template>
            <EditTemplate Context="cat">
                <RadzenSwitch @bind-Value="cat.Ativo" />
            </EditTemplate>
        </RadzenDataGridColumn>

        <RadzenDataGridColumn TItem="CategoriaDto" Title="Ações" Width="180px"
                              TextAlign="TextAlign.Center" Sortable="false">
            <Template Context="cat">
                <RadzenButton Icon="edit" ButtonStyle="ButtonStyle.Light"
                              Size="ButtonSize.Small"
                              Click="@(() => EditarLinha(cat))" class="rz-mr-1" />
                <RadzenButton Icon="delete" ButtonStyle="ButtonStyle.Danger"
                              Size="ButtonSize.Small"
                              Click="@(() => ConfirmarExclusao(cat))" />
            </Template>
            <EditTemplate Context="cat">
                <RadzenButton Icon="check" ButtonStyle="ButtonStyle.Success"
                              Size="ButtonSize.Small"
                              Click="@(() => SalvarLinha(cat))" class="rz-mr-1" />
                <RadzenButton Icon="close" ButtonStyle="ButtonStyle.Light"
                              Size="ButtonSize.Small"
                              Click="@CancelarEdicao" />
            </EditTemplate>
        </RadzenDataGridColumn>
    </Columns>
</RadzenDataGrid>

The main difference lies in EditMode="DataGridEditMode.Single": when the user clicks “Edit”, the row enters edit mode — text fields and the switch appear in place of the static values. The buttons change from “Edit/Delete” to “Save/Cancel”.

The inline editing logic:

 1
 2
 3
 4
 5
 6
 7
 8
 9
10
11
12
13
14
15
16
17
18
19
20
21
22
23
24
25
26
27
28
29
30
31
32
33
34
35
36
37
38
39
40
41
42
43
44
45
46
47
48
49
50
@code {
    RadzenDataGrid<CategoriaDto> grid = default!;
    IList<CategoriaDto> categorias = [];
    CategoriaDto? categoriaEditando;

    async Task InserirNova()
    {
        var nova = new CategoriaDto { Ativo = true };
        categorias.Insert(0, nova);
        categoriaEditando = nova;
        await grid.EditRow(nova);
    }

    async Task EditarLinha(CategoriaDto cat)
    {
        categoriaEditando = cat;
        await grid.EditRow(cat);
    }

    async Task SalvarLinha(CategoriaDto cat)
    {
        await grid.UpdateRow(cat);
    }

    async Task OnRowUpdate(CategoriaDto cat)
    {
        var request = new AtualizarCategoriaRequest
        {
            Nome = cat.Nome,
            Descricao = cat.Descricao,
            Ativo = cat.Ativo
        };
        await CategoriaService.AtualizarAsync(cat.Id, request);
        categoriaEditando = null;
        await CarregarDados();
    }

    async Task OnRowCreate(CategoriaDto cat)
    {
        var request = new CriarCategoriaRequest
        {
            Nome = cat.Nome,
            Descricao = cat.Descricao,
            Ativo = cat.Ativo
        };
        await CategoriaService.CriarAsync(request);
        categoriaEditando = null;
        await CarregarDados();
    }
}

The flow for “New Category” is: insert an empty object at position 0 of the list → grid.EditRow() puts that row in edit mode → the user fills it in → SalvarLinha calls grid.UpdateRow() → OnRowCreate fires (because Id == 0) → API called → data reloaded.

When to use inline editing vs dialog:

ScenarioInline EditingDialog
Simple entities (2-4 fields)✅ IdealOverkill
Complex entities (5+ fields, dropdowns)Confusing✅ Ideal
Fields with elaborate validationLimited✅ More visual space
Quick and frequent editing✅ Fewer clicksMore clicks
Mobile UX⚠️ Can get cramped✅ Better on small screens

Tips and Good Practices

  1. Centralize HTTP calls in typed services — never inject HttpClient directly into the .razor component. That violates separation of concerns and makes testing harder. Services like ProdutoApiService encapsulate URLs, serialization and error handling in a single reusable place.

  2. Use DataAnnotations + Radzen validators for double validation — RadzenRequiredValidator and RadzenNumericRangeValidator validate on the client; DataAnnotations on the request DTO validate on the server. If someone bypasses the UI and calls the API directly, server-side validation still protects the data.

  3. RadzenNotification for EVERY action — consistent visual feedback on success (“Produto criado”) and error (“Não foi possível salvar”). Set different durations: 4 seconds for success, 6+ for errors (the user needs more time to read the error message).

  4. LoadData event for server-side pagination — never load all the data on the client with a complete list. With LoadData, only the current page is transferred over the network. For a catalog with 10,000 products, loading everything into the browser’s memory is unfeasible; with server-side pagination, each request brings only 20 records.

  5. Componentize reusable forms — ProdutoForm serves for both creation AND editing. The distinction is a nullable Parameter (int? ProdutoId). This pattern eliminates code duplication and ensures consistency between the creation and edit flows.

  6. Configure appsettings.json for the API URL — never hardcode URLs. wwwroot/appsettings.json in Blazor WASM works as a per-environment configuration file. In production, replace it with appsettings.Production.json containing the real API URL.

  7. Implement a loading state in the DataGrid — the RadzenDataGrid IsLoading property shows a spinner while the API is called. Without visual feedback, the user does not know whether the action was triggered or the application froze. Set isLoading = true before the call and false after.

  8. Configure AOT + Trimming for production — Blazor WASM bundle size is a real concern. For production, enable AOT compilation and trimming in the .csproj:

    1
    2
    3
    4
    
    <PropertyGroup>
      <RunAOTCompilation>true</RunAOTCompilation>
      <PublishTrimmed>true</PublishTrimmed>
    </PropertyGroup>
    

    AOT compiles IL to native WebAssembly (faster execution), and trimming removes unused code (smaller bundle). The trade-off is a significantly longer build time.


Conclusion

In this tutorial, I built a full CRUD with Blazor WebAssembly .NET 10 and Radzen Blazor: a DataGrid with server-side pagination and search, forms with client-side and server-side validation, modal dialogs for creation and editing, inline editing for simple entities, deletion with confirmation and visual notifications for feedback — all in C#, without the developer writing a single line of JavaScript.

Radzen Blazor delivers mature visual components for the enterprise CRUD scenario. RadzenDataGrid with LoadData solves server-side pagination elegantly. The validators (RadzenRequiredValidator, RadzenNumericRangeValidator) work well for basic validation. DialogService and NotificationService cover the complete user interaction flow.

But it is important to be transparent about the limitations I found during development:

  • Radzen.Blazor.js is required — despite the “zero JavaScript” slogan, the library depends on internal JS to render complex components. It is not JavaScript written by the developer, but it is JS running in the browser.
  • Two-way binding requires classes, not records — Radzen’s @bind-Value needs mutable setters. Records with init do not work for edit forms. This forces the use of classes for DTOs in Blazor WASM.
  • The bundle size is still significant — the .NET runtime + Radzen + the application result in a considerable initial download. AOT and trimming help, but do not solve it completely.

As I analyzed in the previous article, Blazor WASM is viable for enterprise contexts — and this tutorial shows that the component ecosystem supports real scenarios. The choice between Blazor WASM and JavaScript frameworks such as Angular or React depends on the team’s profile, SEO/SSR requirements and tolerance for bundle size, as I discussed in the comparison.

Clone the repository, run the API and Blazor WASM, and form your own opinion. The complete code is in frontend/blazor-wasm/ and src/BlogSamples/Produtos/.


Read Also


References