
Introduction
When it comes to authentication and authorization in modern applications, many teams’ first reaction is to reach for paid cloud solutions — Azure Entra ID, AWS Cognito, Auth0 or Firebase Auth. They are excellent services, but they carry costs that can surprise you as the user base grows: plans priced per MAU (Monthly Active Users), token limits, charges for social login and MFA. In many scenarios, especially startups, personal projects, on-premises environments and companies that value data sovereignty, there is a free, open-source, enterprise-grade alternative that deserves full attention: Keycloak.
Keycloak is an identity and access management server maintained by the Cloud Native Computing Foundation (CNCF) as an incubating project, originally created by Red Hat. It implements the OAuth 2.0, OpenID Connect and SAML 2.0 protocols — the same ones used by Azure Entra ID, Google and other identity providers — but it runs on your infrastructure, with no licensing costs, no user limits and full control over the data. If you already understand the fundamentals of authentication and authorization with JWT, OAuth2 and OpenID Connect, you are ready for the next step: getting a complete identity provider running with Docker or Podman and integrating it with your ASP.NET Core application using C# 8.0+.
In this article, I run Keycloak in a container, configure a realm and a client, integrate it with a REST API in C#, customize the login page with a custom logo and theme, and compare it with the main cloud identity providers. The focus is practical, functional and 100% free.
💡 Tip: Although the examples in this article use C# with ASP.NET Core, Keycloak is language- and framework-agnostic. Because it implements open protocols (OAuth 2.0, OpenID Connect, SAML 2.0), it works with any technology that supports these standards — including Java/Spring Boot, Python/Django/Flask/FastAPI, Node.js/Express/NestJS, Go, PHP/Laravel, Ruby on Rails, Rust and Angular/React/Vue on the front end. The Keycloak container setup and the realm/client configuration are identical regardless of your application’s language.
📦 Source code: The complete implementation of this article is in the blog-zocateli-sample repository on GitHub. Clone it, explore it and adapt it to your context.
Why Choose Keycloak?
Zero Cost vs Cloud Providers
The main argument in favor of Keycloak is simple: it costs nothing. While cloud providers charge per active user or per premium feature, Keycloak offers everything for free:
| Feature | Keycloak (Free) | Azure Entra ID | AWS Cognito | Auth0 |
|---|---|---|---|---|
| Base cost | $0 | Free up to 50,000 MAU (External ID) | Free up to 50,000 MAU | Free up to 7,500 MAU |
| Unlimited users | ✅ | ❌ (charges past the limit) | ❌ (charges past the limit) | ❌ (charges past the limit) |
| Social login | ✅ Unlimited | ✅ | ✅ | ✅ (limited on free tier) |
| MFA (Multi-Factor) | ✅ Included | ✅ | ✅ (extra cost for SMS) | ✅ (limited on free tier) |
| SAML + OIDC | ✅ Both | ✅ Both | ✅ OIDC / ⚠️ limited SAML | ✅ Both |
| UI customization | ✅ Full (FreeMarker themes) | ⚠️ Limited | ⚠️ Limited | ✅ (paid plans) |
| Self-hosted | ✅ Required | ❌ SaaS only | ❌ SaaS only | ⚠️ Enterprise plan |
| Data sovereignty | ✅ Full | ❌ Data at Microsoft | ❌ Data at AWS | ❌ Data at Auth0 |
💡 Tip: Keycloak does not necessarily replace cloud providers in every scenario. If your company is already in the Azure ecosystem and needs native integration with Microsoft 365, Teams and Entra ID, Azure Entra remains the best choice. Keycloak shines when you need full control, predictable (zero) cost and vendor independence.
Main Features
Keycloak includes features that cloud providers charge for separately:
- Single Sign-On (SSO) — a single login across multiple applications
- Identity Brokering — federation with external providers (Google, GitHub, Facebook, Azure AD, SAML)
- User Federation — integration with LDAP and Active Directory
- Fine-grained Authorization — authorization policies based on roles, groups, scopes and resources
- Multi-Factor Authentication (MFA) — TOTP, WebAuthn/FIDO2, SMS, email
- Account Management Console — a self-service portal where users manage their profile, sessions and 2FA
- Admin Console — a complete web panel to manage realms, clients, users and roles
- Event Logging and Audit Trail — detailed logging of authentication events
- REST API for Administration — full automation via API
- Extensibility via SPI — Service Provider Interfaces for advanced customizations
Prerequisites
- Docker Desktop or Podman installed and working
- .NET 8.0 SDK (or later) installed — download here
- VS Code or Visual Studio as the IDE
- Basic knowledge of OAuth2 and OpenID Connect
Keycloak in a Container: Complete Setup
Docker Compose for Development
The fastest and recommended way to run Keycloak locally is in a container. I use docker-compose with PostgreSQL as the database (the same database you would use in production):
| |
⚠️ Warning: The
start-devcommand enables development mode with HTTP, local cache and theme hot-reload. Never usestart-devin production — usestartwith HTTPS configured and the proper production variables.
Start the stack:
| |
After a few seconds, open the admin panel at http://localhost:8180 with the credentials admin / admin.
Initial Configuration: Realm and Client
Keycloak organizes everything into Realms — each realm is an isolated space with its own users, clients, roles and settings. The master realm is reserved for server administration. I create a realm for the application:
1. Create a Realm
- In the admin panel, click the
masterdropdown in the top left corner - Click Create Realm
- Fill in: Realm name =
meu-app - Click Create
2. Create a Client (for the ASP.NET Core API)
- In the
meu-apprealm, go to Clients → Create client - Fill in:
- Client type: OpenID Connect
- Client ID:
minha-api
- On the next screen:
- Client authentication: ON (confidential client)
- Authorization: ON (if you want to use authorization services)
- In Valid Redirect URIs:
https://localhost:5001/*andhttp://localhost:5000/* - In Web Origins:
+(allows all origins of the redirect URIs) - Click Save
3. Get the Client Secret
- After saving, go to the Credentials tab
- Copy the Client secret — you will need it in the API configuration
4. Create a Test User
- Go to Users → Add user
- Fill in:
- Username:
usuario.teste - Email:
[email protected] - First Name:
Usuário - Last Name:
Teste - Email verified: ON
- Username:
- Click Create
- Go to the Credentials tab → Set password
- Set a password and uncheck Temporary
5. Create Roles
- Go to Realm roles → Create role
- Create the roles:
admin,user,manager - Assign roles to the user: Users → select the user → Role mapping tab → Assign role
ℹ️ Info: Everything I did manually above can be automated via the Keycloak Admin REST API or by importing a realm as JSON — ideal for CI/CD pipelines.
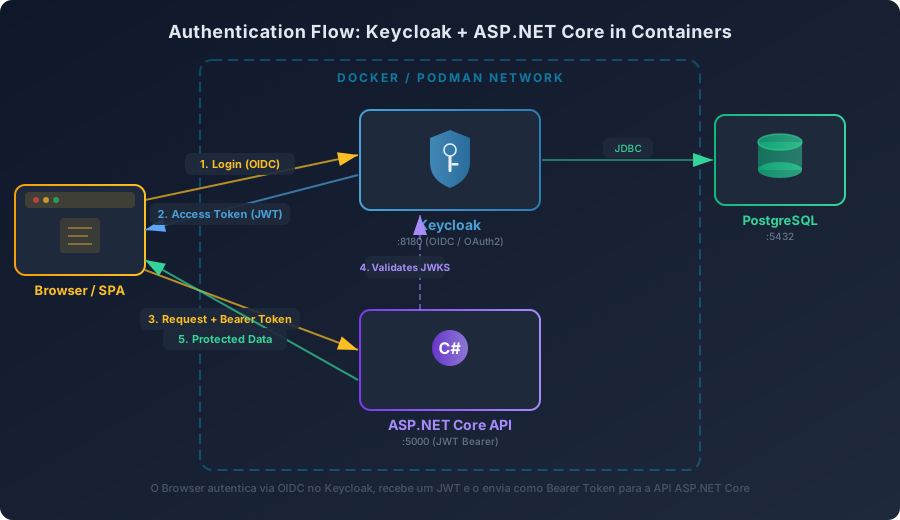
Overview of the Authentication Flow
Before diving into the code, see how the pieces fit together. The diagram below shows the complete flow: the Browser authenticates through OpenID Connect in Keycloak, receives a JWT and sends it as a Bearer Token to the ASP.NET Core API, which validates the token using Keycloak’s public keys (JWKS):
Integration with C# and ASP.NET Core
The following examples use C# with ASP.NET Core, but the same flow applies to any language/framework. Keycloak communicates through standard protocols (OIDC/OAuth2), so the integration comes down to configuring JWT Bearer validation in your stack — something every modern platform supports natively or through a library:
| Language / Framework | Integration Library / Feature |
|---|---|
| C# / ASP.NET Core | Microsoft.AspNetCore.Authentication.JwtBearer (used in this article) |
| Java / Spring Boot | Spring Security OAuth2 Resource Server — spring-boot-starter-oauth2-resource-server |
| Python / Django | django-allauth or mozilla-django-oidc |
| Python / FastAPI | python-jose + manual JWT validation or fastapi-keycloak |
| Node.js / Express | keycloak-connect (official adapter) or jsonwebtoken + JWKS |
| Node.js / NestJS | nest-keycloak-connect |
| Go | go-oidc (CoreOS) |
| PHP / Laravel | socialiteproviders/keycloak or robsontenorio/laravel-keycloak-guard |
| Ruby on Rails | omniauth-keycloak |
| Angular / React / Vue | keycloak-js (official adapter for SPAs) |
ℹ️ Info: Keycloak also offers official adapters for several platforms. However, for new integrations the recommendation is to use your language’s generic OIDC/JWT libraries — that way you are not coupled to a Keycloak-specific adapter.
API Configuration
I create a REST API protected by Keycloak using ASP.NET Core 8 with OpenID Connect / JWT Bearer authentication:
| |
Configure appsettings.json with the Keycloak data:
| |
⚠️ Warning: In production,
RequireHttpsMetadatamust betrueand theClientSecretmust come from environment variables or Azure Key Vault, never hardcoded inappsettings.json.
Program.cs — Complete Configuration
| |
💡 Tip: Keycloak stores realm roles inside a claim called
realm_accessin the JWT. The code above extracts those roles and maps them to .NET’sClaimTypes.Role, which lets you use[Authorize(Roles = "admin")]normally. Without this mapping,User.IsInRole("admin")does not work.
Protected Controller
Create a controller that demonstrates the different access levels:
| |
Getting a Token for Testing
To test the API, you need to get a token from Keycloak. Use the Resource Owner Password flow (for testing/development only):
| |
The response will contain the access_token. Use it to call the API:
| |
Expected output:
| |
Service for Communicating with the Admin API
For scenarios where your application needs to manage users, roles or sessions programmatically, Keycloak exposes a complete Admin REST API. Here is how to create a service to consume this API:
| |
Register it in Program.cs:
| |
ℹ️ Info: For the
minha-apiclient to access the Admin API, you need to enable the client’s Service Account in Keycloak and assign therealm-management→realm-adminrole to the service account.
Implementing Logout
Logout in a Keycloak integration goes beyond simply discarding the token on the client side. For the session to be completely terminated, Keycloak must be notified so it also invalidates the session on the identity server — this is called RP-Initiated Logout (OpenID Connect specification).
Keycloak exposes the logout endpoint at:
| |
Logout via API (Back-Channel)
To invalidate the user’s session directly from your API, use the refresh_token or the id_token_hint:
| |
Register IHttpClientFactory in Program.cs (if it is not registered yet):
| |
Testing Logout
1. Get a token (including the refresh_token):
| |
💡 Tip: The
offline_accessscope ensures Keycloak returns arefresh_tokenin the response. Without it, depending on the client configuration, the refresh token may not be issued.
2. Log out via the API:
| |
3. Or get the logout URL for redirection (front-channel):
| |
Logout on the Front End (SPA)
For front-end applications (Angular, React, Vue), logout is usually done by redirecting to the Keycloak endpoint:
| |
If you are using the official keycloak-js adapter, logout is even simpler:
| |
⚠️ Warning: For
post_logout_redirect_urito work, the redirect URL must be registered in the client’s Valid Post Logout Redirect URIs in Keycloak. In development, addhttp://localhost:*. In production, use only the exact URLs of your domain.
Customizing the Login Page
One of Keycloak’s great advantages over cloud providers is the complete freedom to customize the login page. You can change the logo, colors, fonts and texts, and even create themes entirely from scratch using FreeMarker templates.
Structure of a Keycloak Theme
Keycloak uses a theme system based on FreeMarker Templates. Each theme can partially override the default theme (keycloak or keycloak.v2):
| |
Creating the Custom Theme
1. The theme.properties file
| |
2. Custom CSS (resources/css/login.css)
| |
3. Portuguese Messages (messages/messages_pt_BR.properties)
| |
Mounting the Theme in the Container
Add the theme volume to docker-compose.keycloak.yml:
| |
Alternatively, enable the theme from the admin panel:
- Go to Realm Settings → Themes tab
- In Login theme, select
meu-tema - Click Save
💡 Tip: In
start-devmode, Keycloak hot-reloads themes automatically. Just save the CSS file or the FreeMarker template and reload the login page to see the changes instantly — no need to restart the container.
Visual Result
After applying the theme, the login page will have:
- ✅ Your company logo at the top
- ✅ Custom colors on buttons and fields
- ✅ Texts in Brazilian Portuguese
- ✅ Login card with rounded corners and a soft shadow
- ✅ Background with a custom gradient
- ✅ Custom favicon
📝 Example: Companies such as Red Hat, Siemens and Deutsche Telekom use Keycloak with fully customized themes that are indistinguishable from proprietary SaaS solutions. End users never notice they are using an open-source identity provider.
Keycloak in Production with Containers
Docker Compose for Production
For production, the differences from the development setup are:
| |
⚠️ Warning: For production, consider using
buildinstead of volumes for the theme. The official image supports a multi-stage build withkc.sh buildto optimize startup:
| |
Production Tips — Security and Performance
Reverse proxy with Nginx:
If Keycloak sits behind Nginx (as in the architecture described in the BFF pattern), configure the location for reverse proxying:
| |
Tips and Good Practices
Keep the production realm separate from admin — never use the
masterrealm for your users. Create specific realms per application or business domain.Export and version the realm configuration — use Keycloak’s export endpoint (
/admin/realms/{realm}/export) to save the configuration as JSON and version it in Git. This lets you recreate the entire environment from code (Infrastructure as Code).Enable rate limiting on the reverse proxy — Keycloak handles authentication, a frequent target of brute-force attacks. Configure
limit_reqin Nginx to restrict requests to the login endpoint.Configure the Infinispan cache properly — in production with multiple instances (cluster), Keycloak uses Infinispan for distributed session caching. See the official caching documentation for high-availability scenarios.
Monitor with health checks and metrics — enable
KC_HEALTH_ENABLEDandKC_METRICS_ENABLEDto expose/healthand/metricsendpoints (Prometheus-compatible).Use
start --optimizedin production — thestartcommand with the--optimizedflag precompiles the configuration and drastically reduces startup time (from ~30s to ~5s).Update regularly — Keycloak receives frequent security updates. Follow the official blog and test new versions in staging before updating production.
Back up the database regularly — Keycloak’s PostgreSQL holds all identity data. A scheduled
pg_dumpis mandatory for any production environment.
Comparison: When to Use Keycloak vs Cloud
| Scenario | Recommendation |
|---|---|
| Startup with a limited budget | ✅ Keycloak — zero cost, all features |
| Company already in the Microsoft 365 ecosystem | ⚡ Azure Entra ID — native integration |
| 100% AWS serverless application | ⚡ AWS Cognito — integration with Lambda/API Gateway |
| Data sovereignty requirement (LGPD, GDPR) | ✅ Keycloak — data stays on your infrastructure |
| Team without infra/container experience | ⚡ Auth0 or Firebase Auth — managed SaaS |
| On-premises or air-gapped scenario | ✅ Keycloak — the only viable option |
| Need for full UX customization | ✅ Keycloak — unlimited FreeMarker themes |
| High scale (millions of MAU) | 🤔 It depends — Keycloak scales, but requires cluster expertise |
ℹ️ Info: Nothing prevents a hybrid approach. Many companies use Keycloak as an identity broker federating with Azure AD/Google Workspace. Employees log in with corporate SSO (Azure AD), while session and authorization data stay centralized in Keycloak.
Conclusion
Keycloak is one of the most underrated tools in the open-source ecosystem. It delivers, for free, features that cloud providers charge hundreds or thousands of dollars a month for: SSO, MFA, identity brokering, user federation, full UI customization and a powerful REST API for automation. Running it in a container with Docker or Podman is trivial, and the OpenID Connect integration is straightforward — in this article I demonstrated it with ASP.NET Core and C#, but the same flow works with Java, Python, Node.js, Go, PHP, Ruby and any other technology that supports JWT and OIDC. Keycloak is a language-agnostic identity server: the authentication layer runs in the container, and your application only validates standard tokens.
If you work in a scenario where cost matters, where data sovereignty is a requirement, or you simply want full control over your application’s authentication and authorization — regardless of language or framework —, Keycloak deserves a prominent place in your stack. Start small, in a development environment with Docker Compose, validate the flow with your application, customize the login page with your brand’s visual identity and, once you are confident, promote it to production with HTTPS, a reverse proxy and backups.
Authentication is the front door of your system — and with Keycloak, that door is free, secure and entirely yours.
Read Also
- Authentication & Authorization: JWT, OAuth2, OpenID Connect — fundamentals of the protocols Keycloak implements
- BFF Backend For Frontend: Security in SPAs — an architectural pattern that pairs perfectly with Keycloak as the identity provider
References
- Keycloak — Official Website — documentation, downloads and quick start guide
- Keycloak Server Administration Guide — complete server administration guide
- Keycloak Docker Image — Quay.io — official container image
- Keycloak Admin REST API — complete reference of the administration API
- Keycloak Themes Documentation — theme customization guide
- Microsoft — JWT Bearer Authentication in ASP.NET Core — official .NET documentation for JWT authentication
- CNCF — Keycloak Project — project page at the Cloud Native Computing Foundation
- blog-zocateli-sample repository — Keycloak — Complete source code for the examples in this article
By commenting, you agree to our Privacy Policy, Terms of Use, Data Deletion Policy.